Monday, May 9, 2011

Planting and Watering


 We've finished the steps and put gravel on the paths around the garden pads!


Now that the cosmetics are done, we have to learn about TLC for our starts. We've been gradually hardening the tomatoes, peppers, squash and cucumbers (the warmth-loving plants) hoping they will adjust to our still chilly weather if we put them out for 2 or 3 hours a day for a few days. We're on a schedule to increase their outdoor time a little each day over the next 10 days, at which time we'll bravely plant them in our troughs.

Meanwhile, we are still top-watering the lettuce, beats and spinach on the sunny days. The water from the reservoir at the bottom of the troughs should be wicking upward, plus it's been raining a little most days. Although it's guess-work about how much to water them, they're looking pretty perky and healthy, a good sign.


We bought carrot (Nantes Half Long) and radish (Cherry Belle) seeds today! On the recommendation of our Master Gardner friend, Megan,  we're going to mix the seeds and sprinkle them into a half-inch ditch. If all goes well, the radishes will appear first, be thinned, and be ready to eat in about 3 weeks. Meanwhile, the slower carrots will emerge in 2-3 weeks. We'll begin harvesting them mid to late July.


Hollie continues to be the garden supervisor, curious and attentive to all we do out there.

Monday, May 2, 2011

Our South-Facing View

We have a deck off our living room, overlooking our property as it slopes downward toward a creek. This is a south-facing view. We've always enjoyed sitting out on the deck in the late spring through fall months, reading and listening to music. Now we have the added benefit of being able to see our garden grow!


Our property is located roughly in the middle of San Juan Island, which is in the Northwest corner of Washington State surrounded by the waters of Puget Sound. We are about 8 miles as the crow flies from Victoria, British Columbia. Our weather is different than Seattle's because we are in the rain shadow of the Olympic Mountains. In the winter we are also affected by weather patterns flowing south down the Fraser River Valley in Canada.

Potatoes

I'm Irish, well part Irish, so of course we have to grow potatoes. We chose some organic red fingerlings and a white potato to start. The knowledgeable helper at the nursery told us about the gunny-sack growing method and we decided to try it.

We planted the spuds in the bottom of a gunny-sack with the top rolled most of the way down in dirt that does not include manure (we eat the skins). As they develop a some height (about 6 inches), we'll roll up the sack a little and add soil. We will continue to roll the bag up and add soil periodically until the plants flower. At that time we will cease to water them and wait to harvest until the tops begin to die back.


This leaky, old, galvanized bucket is a perfect holder for the gunny sack. I drilled a bunch of extra holes in the bottom for good drainage.

Sculpture - Rusty Push Plow Cultivator

I have a passion for rust! I enjoy looking at old, rusty equipment and tools. Recently a friend found part of a human-powered garden cultivator plow on his property. I had to have it for the garden.  Here are a couple of pictures of it.


This is our cat, Hollie-three-bell-huntress. She loves to roll on these slabs of slate which are being used to make some steps down into the garden between the horse troughs. Hollie has been under the gate and up onto the dirt, exploring "her" new garden. We'll have to keep a sharp eye on her activities around the dirt...

Planting Our Garden

At last, with water, fence and horse-trough preparations behind us, we are ready to start planting.

We bought organic starts from Browne's Nursery, located here on San Juan Island:

    ~ lettuces (romaine, red romaine and red leaf)
    ~ early beets
    ~ spinach

Here is Robin planting the romaine lettuces.


Here's how the garden looks with our first two troughs partially planted. We will plant some more after it warms up a bit more. We're still in the mid-30s at night.

Dirt

Now that the horse-troughs are "plumbed" and ready to plant, we need to add the dirt. Our gardening friends tell us "It's all about soil... get the right soil mix, and you'll grow great vegetables!" We discovered there are lots of options and lots of opinions on what constitutes the "right soil mix."

For this year, we decided to go with what was most readily available. Our neighbors had purchased 7 yards of topsoil consisting of half compost and half sand. Since they didn't use it all, they suggested we buy it from them.

loading topsoil for garden

Here's my truck getting the first load.

One of our experienced gardening friends suggested we add a half-and-half mix of chicken and steer manure. Following the guidelines on the bags, we added about a half a bag of each to each of the horse troughs.

Robin's parents were both avid gardeners, her dad growing veggies and her mom growing flowers. Her dad passed nearly 5 years ago and her mom just recently. We have a small vial of their co-mingled ashes, which you can see in the picture below Robin is adding to our soil mix for good garden juju.


Just before planting, we also added some bonemeal to the top layer of the soil. Here's how the garden looks, ready to plant the first two troughs...

soil in horse troughs, ready to plant

Note: each of the troughs (6 x 2 x 2 feet) required about 6 wheelbarrows full of soil.

Deer

You can see from the pictures below why we had to build a fence around our garden.

deer on San Juan Island, must have garden fenced

deer on San Juan Island, must have garden fenced

Horse Trough Gardening

land on San Juan Island, rocks, moss, madrona, trees

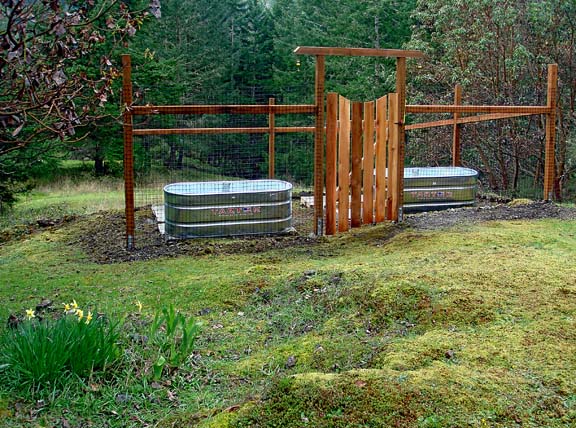
Our land is bed rock and not level. So to make a garden, we needed to terrace a sloping, south-facing hillside, making level areas for the beds. Also, since we're both seniors now, the need to save wear and tear on our backs sent us looking for a system of raised beds. Finally, we wanted a system that would conserve water because we rely on rain for our only water supply and face a 3-month dry spell every summer..

A good friend with decades of gardening and countless hours of garden magazine-reading under her belt, told us about an article she had read in Mary Jane's Farm about horse trough gardening. We found a pdf file on the internet showing amazing pictures from the experimental garden using this system (here). We decided to try it!

This raised-bed system features a 4" reservoir of water in the bottom of each trough, a feeder tube for adding water and an over-flow indicator hole in the trough. Although one must top-water a little at first, the plants soon begin to take their water from the reservoir. Less water is required than top-watering or drip-hose systems. Methods of planting, rotating crops and spacing follow the principles of "intensive gardening." More on that subject in later posts.

horse trough garden, animal watering trough garden

We ordered the troughs from our local building supply place. They come "nested," one inside the other, making one of them slightly smaller than the specified 2' x 6' x 2' deep.

The next step was to get PVC pipe for the water reservoir system at the bottom of the troughs. For each trough, we cut about 22 pieces of 4" perforated PVC pipe, 4" high. To make "soil legs" we cut 5 pieces of 4" non-perforated PVC pipe, 6" high and then drilled about 30 quarter-inch holes in each piece. We spaced these out evenly on the bottom of the trough.

Following the specifications from Mary Jane's Farm, we found a source (McMasters-Carr) for polypropylene screen, 3/16th inch thick with staggered 5/16th inch holes, to place over the PVC tubes to separate the water reservoir from the dirt above, and still allow the water to wick up into the soil. We made cardboard "patterns" from the shipping carton and then used a jigsaw to cut the screens to fit the troughs. We also cut five 4-inch holes in the screen for the "soil legs" and a 2-inch hole at one end for the filler pipe. Finally, we drilled a 1/2-inch hole at one end of each trough. We'll know when to stop adding water to the reservoir when it begins to drain out of this hole.

horse trough garden, animal watering trough garden

The assembled trough-innards look like this. The screen fits over the "soil legs" (which get filled to the bottom with dirt and help the water to wick upward) and rests on top of the 4" sections of PVC. The filler tube is inserted through the 2" hole in the screen. Now it's ready for the dirt. I'll write more about that in the next post.

By the way, we decided to fill only 2 troughs this year, our first attempt at gardening. But we created pads for a total of 8 troughs and plan to add more next year if it's working for us.

Sunday, May 1, 2011

Fence

Once we got the water issues addressed, the next thing of concern was the herd of deer which roam freely over our land all year long. Not being in the least fearful of us or our cat, they would happily eat anything we planted. Obviously, we needed a fence.

Where to put it? Our 5-acres is sloped and shaded, entirely devoid of any sunny, level areas large enough for a garden. Just to the south of our house, there's a long, gradual slope that gets nearly full sun. Sun is good; slope isn't so good. But it was the only choice.

We hired Ezra Richardson Contracting, of Lopez Island, an experienced fence builder to build us a 20-foot enclosed garden area. Since we intend to use a horse-trough method of intensive, raised-bed gardening, we also needed level concrete pads on which to put the troughs. I'll be writing more about them in the next post.

So below is a picture story about building the fence and concrete pads.

deer-proof garden fence, San Juan Island

deer-proof garden fence, San Juan Island

deer-proof garden fence, San Juan Island

deer-proof garden fence, pads for horse trough planting beds

deer-proof garden fence, pads for horse trough planting beds

deer-proof garden fence, pads for horse trough planting beds

deer-proof garden fence, gate

Robin, being a bead artist, made tassels with Tibetan beads and bells, mounting them from the gate top. She also "inscribed" two of the concrete pads, one with our initials and the other with a spiral. Now we're ready to garden!

Water

Robert and Robin

Here we are, Robert and Robin

our land, San Juan Island

This is our 5 acres of land on a bed-rock ridge covered with moss and wildflowers, madrona, doug fir and pines. We're about 500 feet above sea level, 6 miles from the town of Friday Harbor We have no connection to town water and no well.

We collect rain water in a catchment system off the roofs of our buildings. Generally we have to skimp in the summer because it's dry here for 3 months with no rain at all.

Gardens need water!!! What to do? Answer: build a water storage system to be filled during the winter and spring when it rains a lot.

We ordered two tanks (cisterns) which were delivered on a 36' truck. I assisted the driver to unload them by stopping them from rolling down the hill when he pushed them off the truck bed. One of them took an odd bounce and knocked me flat. I ended up at 6 AM in about four inches of very soggy moss, a sponge landing. Lucky, wet me...

catchement, water storage cisterns, 3000 gal

Here they are, ready for us to roll into place.

catchement, water storage cisterns, 3000 gal

We installed two storage cisterns, each with a capacity of 3,000 gallons, on wood-framed "beds" of sand..

catchement, water storage cisterns, on bed of sand

Here's a closer look at them... big fellas, aren't they!

catchement system, feed plumbing

We top-load by pumping water from our other cisterns, the ones filled from the rooftops, using 2-inch fire hose and a gas-powered bilge-pump.

catchement, plumbing for release system

We bottom-release by pumping water from the storage cisterns to our house system from which we will water the garden. Voila! Water is now available!