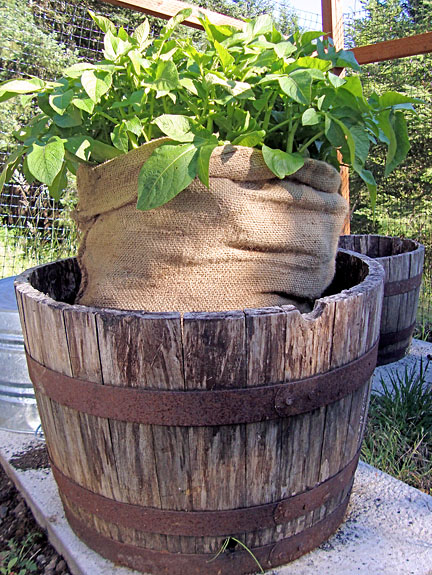
Today was a big harvest day, above average zucchini yield (about 3 pounds), plus we decided to dig into the first gunny sack we planted with potatoes and see what we got.
Here's how it looked on day 1, potato planting day, which was around the 1st of May.
After 2 weeks, we had some leaves showing.
After a couple more weeks, we were ready to start unrolling the sack so we could add more dirt.
We did two batches of gunny sack potatoes. For the first we used an old sack I'd been storing in the garage for a long time. In that one, we planted fingerling potatoes and a few Yukon golds. For the second batch, we used a brand new gunny sack and planted bakers. About the second time we unfolded the old sack to add more dirt, it began to fall apart, rotting. Therefore, we were never able to fill it as per the plan.
Today, Robin decided to see and harvest whatever was produced in the three layers of dirt. The other sack is still going strong, filled to the brim and not yet dying off.
Here's what we got. And see that one little cherry tomato? It's our first ripe tomato!!! Sweet as can be! We ate some of the fingerlings for dinner tonight. Delicious!!!
Here's what we learned. Don't use old gunny sacks for growing potatoes. We stopped watering when the tops started to bloom. We think it would be better to keep watering them until the tops turn yellow and collapse. There were more than 50 potatoes about the size of a pea or slightly larger, willing and able to grow into something big enough to eat. It's all an experiment for us. One thing to try next year is to plant the spuds with a little more dirt beneath them. Maybe not watering, but waiting longer to harvest would be a good thing too. We'll do it a little differently with the other sack and see how that goes.
Here's our one ripe tomato. More on the way soon. Lots more!
And here is the still unharvested gunny sack; only now it's totally unrolled, filled with dirt all the way to the top. What does it hold? How many spuds will we get? Keep tuned for the answer to that one...
This is a blog about growing vegetables for home use in the Pacific Northwest. We do raised-bed, intensive gardening using galvanized animal watering troughs as planter boxes. We collect and store rain water for our garden. Our blog records our learning process and experiences with this type of gardening.
Sunday, August 7, 2011
Harvesting and Planting
Never saw such a huge tomato plant! It's a cherry tomato and supposed to be small... must be 5' x 5'! Has lots of blossoms. If the weather stays warm, we're going to be begging neighbors to take them, along with the zucchinis.
For a long time we had no sets. At the suggestion of our gardener-friend-neighbor, we bought some blossom set. Seems to have done the job. Or maybe it's just that we finally had some sunny days. Now there are lots of these little green balls. Green tomato omelets with Jarlsberg cheese are pretty tasty, but we hope at least some of them ripen.
Note about watering: All the troughs are now taking at least some water in the 4" bottom reservoir each day. The tomato-zucchini trough takes a LOT. A couple of weeks ago, we stopped top watering in that trough completely. The plants are thriving, so we assume their roots are well tapped into the reservoir. We still do light top-watering in the other three troughs, especially because of the winter-crop seedlings.
Robin planted the first of our winter-crop seeds on July 25th. By row number from front to back, these seedlings are:
- Left: spinach, Center: butterhead lettuce, Right, Romaine lettuce
- Toscana kale
- flat of Egypt beets
On July 29th, she planted more winter crop seeds... top left: beets; center left: kale, center: broccoli, right: carrots. We made a special trip to South Beach to get white pebbles to mark the trough.
These are the breakfast radishes. Like the beets, they push above the surface of the dirt rather than grow down. We don't know if that's normal or not. Doesn't seem to hurt them. They're slightly more "peppery" than the cherry radishes. The second crop, planted about 2 weeks after these is coming along nicely.
We harvested our first carrot today! It's not so big. Guess we'll wait a while longer to harvest any more of them.
The squash is going crazy! Robin harvested our first acorn squash (two more almost ready), our third eight ball squash and we stopped counting the zucchinis. For dinner tonight, we had fresh sliced zucchini, radishes and the one carrot to dip in blue cheese dressing with our pizza.
Monday, July 25, 2011
Garden Guest & Eight Ball Squash
We had a wee guest in the garden this morning. Apparently sunning itself on the red leaf lettuce, the little green frog seemed wide awake, yet unafraid of the camera.
Wonder if it likes to eat aphids? We know there are lots of frogs in the neighborhood because we hear their great chorus every evening. But we don't know much about them.... yet.
Yesterday, Robin harvested our first eight ball summer squash, almost perfectly round, but more the size of a softball than an eight ball. She says she's going to halve and stuff it, top it with Parmesan cheese, and bake it for our dinner tomorrow. We've never seen this type of squash before now. They are a hybrid zucchini, supposedly mild in flavor and firm of flesh
We're also getting a lot of yellow zucchinis off our two plants.
We cleared out some of our lettuce and all of the beets and spinach to make space for fall planting. Today, we planted four winter crops: two types of lettuce, kale and beets.
Wonder if it likes to eat aphids? We know there are lots of frogs in the neighborhood because we hear their great chorus every evening. But we don't know much about them.... yet.
Yesterday, Robin harvested our first eight ball summer squash, almost perfectly round, but more the size of a softball than an eight ball. She says she's going to halve and stuff it, top it with Parmesan cheese, and bake it for our dinner tomorrow. We've never seen this type of squash before now. They are a hybrid zucchini, supposedly mild in flavor and firm of flesh
We're also getting a lot of yellow zucchinis off our two plants.
We cleared out some of our lettuce and all of the beets and spinach to make space for fall planting. Today, we planted four winter crops: two types of lettuce, kale and beets.
Monday, July 18, 2011
Harvesting Our Summer Squash!
A week or so ago, we ate our first zucchini. Today, three more were ripe and ready to eat.
Robin made a delicious stir fry using one green and one yellow squash from today's harvest. Here's her recipe:
2 medium summer squash, sliced
2T olive oil
1T butter (for flavor)
1/2 ring turkey kielbasa, sliced
1 tomato, chopped
left over couscous
a pinch of dried currants
1/4 c roasted slivered almonds
cracked pepper to taste
Stir-fry the kielbasa until slightly browned and set aside. Heat olive oil and butter in skillet. Stir-fry squash until easily pierced with a fork. Add tomato and stir for about 1 minute. Add other ingredients and kielbasa. Stir to mix and serve immediately.
Aphids
A week ago we noticed the beginnings of an aphid infestation on some of our romaine lettuce and one small slug. The honeymoon is over. The garden critters have found us.
After researching on the web and finding several home remedies for aphid control (soap + mineral oil + water in various proportions, in a pump-spray bottle), we decided to go with a commercial spray this time around, two of them actually, one with soap and one with pepper, both supposedly friendly to organic gardens.
To compound the issue, it's been raining, drizzling, cool weather, more like April than July. The rain washes off the spray and the aphids continue to thrive on our lettuce. We'll keep spraying.
In the meantime, Robin learned a good trick from our gardener neighbor. To wash the lettuce, fill a large bowl with water, sprinkle 1/4 tsp. of sea salt on the water and stir, and then rinse the lettuce leaves in the salt water. The aphids just fall right off, kaput. All of them.
After researching on the web and finding several home remedies for aphid control (soap + mineral oil + water in various proportions, in a pump-spray bottle), we decided to go with a commercial spray this time around, two of them actually, one with soap and one with pepper, both supposedly friendly to organic gardens.
To compound the issue, it's been raining, drizzling, cool weather, more like April than July. The rain washes off the spray and the aphids continue to thrive on our lettuce. We'll keep spraying.
In the meantime, Robin learned a good trick from our gardener neighbor. To wash the lettuce, fill a large bowl with water, sprinkle 1/4 tsp. of sea salt on the water and stir, and then rinse the lettuce leaves in the salt water. The aphids just fall right off, kaput. All of them.
Monday, July 4, 2011
4th of July Garden Update
Our strawberries are looking lush.
First yield!!! More on the way!
Squash competing with tomatoes for light.
Looks like we'll have a bumper crop in a month or so.
Now we understand why everybody has zucchini to give away.
Red leaf lettuce is producing more than we can eat
and more than we can give away.
Neighbors, please come and get it!
Robin says it's downright beautiful.
This trough is beautiful too,
marigolds setting off the burgundy and emerald green colors
of the romaine heads.
Kale seems to be growing nicely.
We don't have experience cooking with kale
or know when/how to harvest it... yet!
Gunny sack potatoes doing well.
Almost time to add more dirt... again.
Last time, bag will be totally unrolled.
By the way, when watering tonight, all the troughs took water. We hope this is evidence that the wicking process is finally working. The squash/tomato trough took the most water, a liberal amount. It figures because they'd probably have deeper root systems.
Labels:
gunny sack,
horse trough,
kale,
lettuce,
potatoes,
squash,
strawberries,
water
Friday, July 1, 2011
Bountiful Beets
Although we've been eating beet greens regularly, we harvested our first beets today. My wife will oven-roast them for dinner!
Our bountiful garden pleases us both beyond words!
There Are Radishes... And Then There are Rogue Radishes!
This is what our radishes look like.
When our neighbor was over picking greens and radishes the other day, we pulled up a radish that looked like one of these...
Quite long, and pinkish (rather than red). None of us had seen anything like that before. We were afraid it might be "woody," but our neighbor said she'd take it home and try it. Ten minutes later the phone rang with RAVE reviews from her husband about the rogue radish. Best radish he ever ate, he said, great texture and taste!
Fast forward to a couple of days ago when we were at the hardware store and my wife spotted a packet of Burpee's French Breakfast Radish seeds. There it was, rogue no more, our special radish had a name. Based on our neighbor's positive review of the rogue radish, we bought the seed packet and will get them planted soon!
When our neighbor was over picking greens and radishes the other day, we pulled up a radish that looked like one of these...
Quite long, and pinkish (rather than red). None of us had seen anything like that before. We were afraid it might be "woody," but our neighbor said she'd take it home and try it. Ten minutes later the phone rang with RAVE reviews from her husband about the rogue radish. Best radish he ever ate, he said, great texture and taste!
Fast forward to a couple of days ago when we were at the hardware store and my wife spotted a packet of Burpee's French Breakfast Radish seeds. There it was, rogue no more, our special radish had a name. Based on our neighbor's positive review of the rogue radish, we bought the seed packet and will get them planted soon!
Sunday, June 26, 2011
Visitors to our Garden
Good thing we built the fence!
This pair was cruising for a way to get a taste of our salad greens.
And there's more just out of the hopper.
Our Garden Supervisor and Delicious Spinach Recipe
This is Hollie, our Siamese Supervisor. She has a clipboard, name badge and hardhat, of course, but is too vain to be seen with them, particularly when a camera is involved.
Robin invented another good recipe tonight, one that features our currently over-abundant spinach. Here it is
Chicken Bean Soup with Spinach
- 1 1/4 c of mixed beans/peas (we use Costco's deluxe dry mix)
- 5 c water
- 1 Tbsp of organic, low sodium, chicken bullion
- large sweet potato, peeled and chopped into small pieces
- about 1/2 c celery, chopped
- 1/4 small onion, chopped, sauteed lightly in olive oil
- two medium organic carrots, sliced thin
- one small red pepper, chopped in small pieces
- 6 chicken thighs (boneless, skinless) cut into small bite-sized pieces and sauteed in olive oil
- 1/4 cup dried cranberries
- a large bowl of spinach leaves, fresh from the garden, washed and de-stemmed
Tuesday, June 21, 2011
Horse Trough Gardening - Progress Report
Lettuce
We planted romaine and red-leaf romaine lettuce on May 2nd from organic starts purchased at Browne Lumber/Nursery in Friday Harbor. In two weeks we began harvesting it and have been having dinner salads ever since. It's still going strong. We've given away bags full to neighbors and friends. Above is how it looks today. (The foreground is radishes and carrots.)
Radishes
Lots of luck with our radishes! We planted them from seed sometime around May 15th, thinned about 100 of them out on June 8th, leaving about 60 plants, all of which are looking and tasting quite delicious! Again, we have enough to give many away. We'll plant more when we've harvested all of these.
Carrots
The only problem with planting carrots and radishes together in the same row is that when we pull up the radishes it's almost impossible not to put out several young carrot plants whose delicate tops are intertwined with the radish tops.
Green Peppers
Fun to see these starting to develop! The powdery mildew problem seems under control, with removal of heavily affected leaves and spraying the others (see here).
Summer Squash
Despite our cool spring (and temps only today reaching 70 degrees for the first time), the squash is flowering nicely, portending an adequate crop. We're a bit concerned that the spacing may be too crowded. Time will tell.
Beets
Our beets continue to look promising, even though we've been harvesting the tops from time to time. (See delicious recipe here.) On a few of them, we're just starting to see the top of the beet. They grow tall and might be better placed at the rear of the trough, moving the radishes to the front next year.
The Whole Schamole!
This is how the garden looks from the lower (Southwest) corner, looking up at the troughs. We're mighty pleased with the whole system so far. Our only concern is that the water reservoir in the bottom of the troughs does not seem to be wicking upward, because we never need to add water to the reservoir. We do top-water a little each evening, although it doesn't seem to require much water. We wonder if it will begin to wick more as the temperatures increase this summer.
Speaking of summer, happy solstice to all!
Spinach Bolting!
We have, I think, 6 spinach plants, all of which have been prolific from the get-go.
We always have spinach in our salads and Robin frequently fixes a bit pot of stir-fried spinach (olive oil, roasted almonds, a few cranberries and a huge Dutch oven full of spinach), which is a great treat after buying spinach and parceling it out in meager servings. And still those six plants keep putting out more and more and more leaves! Are we going to turn green ourselves?
Two weeks ago we noticed the plants were bolting, which we learned means flowering, soon to be followed by going to seed. Our gardener friend says the leaves will turn bitter at that point. So, we've been pinching off the tops. It's working so far. The spinach still tastes great and keeps on producing new leaves.
Robin says, "It's so much fun to have a God's lavish of spinach leaves!" We agree that perhaps four plants would be enough next year, although it's been nice to give it away to neighbors and friends.
We always have spinach in our salads and Robin frequently fixes a bit pot of stir-fried spinach (olive oil, roasted almonds, a few cranberries and a huge Dutch oven full of spinach), which is a great treat after buying spinach and parceling it out in meager servings. And still those six plants keep putting out more and more and more leaves! Are we going to turn green ourselves?
Two weeks ago we noticed the plants were bolting, which we learned means flowering, soon to be followed by going to seed. Our gardener friend says the leaves will turn bitter at that point. So, we've been pinching off the tops. It's working so far. The spinach still tastes great and keeps on producing new leaves.
Robin says, "It's so much fun to have a God's lavish of spinach leaves!" We agree that perhaps four plants would be enough next year, although it's been nice to give it away to neighbors and friends.
Wednesday, June 8, 2011
Thinning Radishes & Beets + Beet Greens Recipe
At the suggestion of a neighbor who is quite experienced with growing veggies, we planted our carrots and radishes together, mixing the seeds and sprinkling them in a one-inch-deep ditch. Robin now says she should have used only half the seeds in the packets and heeded the spacing, because they seemed to have all germinated, yielding a solid line of plants all crowded together. The radishes aren't ready to harvest yet, although some of them are nearly an inch in diameter. The carrots are just showing.
Last evening, we decided it was time to thin the radishes. Robin worked the rows, removing over 100 plants! Yet still there are a lavish of them remaining. We are eating the larger baby radishes and have donated the smaller ones and all the tops to our neighbor's chickens.
Our beets also needed thinning. This we did by cutting the tops off some of the plants, rather than pulling them up (as we did the radishes).
Robin concocted a delicious treat for our dinner using the beet tops:
- rinse beet greens and stems; dry using salad spinner or towel
- heat 2 Tbsp olive oil and 1 tsp of butter in large skillet
- add fresh ground pepper (seasoned with a bit of lavender is good)
- add 1/2 tsp honey
- add beet greens
- stir and turn until coated with oil and lightly cooked (limp, but not mushy)
- serve and eat immediately
As you can see below, the lettuce, spinach and all are quite lush now... we're giving some of it away to keep up with its fast-paced growth! Let's hear it for the horse trough gardening system!
Labels:
beets,
garden,
horse trough,
radishes,
raised-bed,
recipe
Gunny Sack Potatoes
If you've been reading my posts, you know we decided to grow our potatoes in gunny sacks this year. I wrote about it here.
The first sack we planted now looks like this:
We figure it's time to unroll the sack a bit and add more dirt. Since some of the sprouts are more developed than others, we'll have to bury a few leaves. We didn't anticipate growth differentiation and hope it's not a problem.
The first sack we planted now looks like this:
We figure it's time to unroll the sack a bit and add more dirt. Since some of the sprouts are more developed than others, we'll have to bury a few leaves. We didn't anticipate growth differentiation and hope it's not a problem.
Powdery Mildew... Treatment Plan
With the moist, cool and somewhat humid spring (typical of the Northwest), our squash, peppers and tomatoes (all heat and sunshine lovers) developed powdery mildew. Yuk!
We let it go a little too long and some of the leaves were covered with it. Research time! First we asked our neighbor at Bountiful Herbs Garden, who said we might be able to prevent further developments of it by spraying with baking soda mixed with water and a little liquid soap. We then searched on line, where we found many useful articles, particularly this one by a California Master Gardner. We decided not to risk contamination of our soil with baking soda and to try, instead, a commercial sulfur treatment.
But first, Robin pruned away all the seriously infected leaves, leaving only those with slight-blight. Powdery mildew spreads by contact such as by touching infected leaves with your fingers and then touching non-infected leaves or by wind, and can also spread by getting into the dirt. Therefore, we disposed of the pruned leaved in a sealed plastic bag in our garbage (not good for the compost!).
We then sprayed the new growth and remaining slight-blight growth using this fungicide which is recommended by our local Master Gardner group as good for organic gardening. I think we've saved our plants! This is how they look now, after pruning and spraying.
We let it go a little too long and some of the leaves were covered with it. Research time! First we asked our neighbor at Bountiful Herbs Garden, who said we might be able to prevent further developments of it by spraying with baking soda mixed with water and a little liquid soap. We then searched on line, where we found many useful articles, particularly this one by a California Master Gardner. We decided not to risk contamination of our soil with baking soda and to try, instead, a commercial sulfur treatment.
But first, Robin pruned away all the seriously infected leaves, leaving only those with slight-blight. Powdery mildew spreads by contact such as by touching infected leaves with your fingers and then touching non-infected leaves or by wind, and can also spread by getting into the dirt. Therefore, we disposed of the pruned leaved in a sealed plastic bag in our garbage (not good for the compost!).
We then sprayed the new growth and remaining slight-blight growth using this fungicide which is recommended by our local Master Gardner group as good for organic gardening. I think we've saved our plants! This is how they look now, after pruning and spraying.
Subscribe to:
Posts (Atom)